From NeOn Wiki
Ontology Module Composition
To extract and manage ontology modules.
Functional Description
The Modules Plugin provides the functionality to extract modules and the operators to manipulate and combine modules. Specifically, this Plugin offers the following functionalities:
- Modify the Export Interface elements for a module M and the Import Interface elements for the modules imported by M.
- Compute the union between two modules by considering or ignoring namespace
- Calculate the intersection between two modules by considering or ignoring namespace
- Compute the difference between two modules by considering or ignoring namespace
- Provide alignment between two modules
Installation and Update
The plugin can be installed and updated via NeOn-Toolkit Update Site:
- Within the NeOn-Toolkit open the Help-menu and select the entry Software Updates->Find and Install ....
- Select Search for new features to install in the appearing window and click Next.
- Then choose the NeOn-Toolkit Update Site and click Finish.
- In the appearing window you can find the Modularization Support plugin under the modularization category. Select the feature of Modularization Support and then click Next and follow the installation instructions shown by the toolkit.
User Documentation
In this section, we first introduce the view of Module Composition and then the view of Module Interface.
Module Composition
- 1. Open the view of module composition: In the menu of "Windows", please choose Show view / Other / Module Composition.
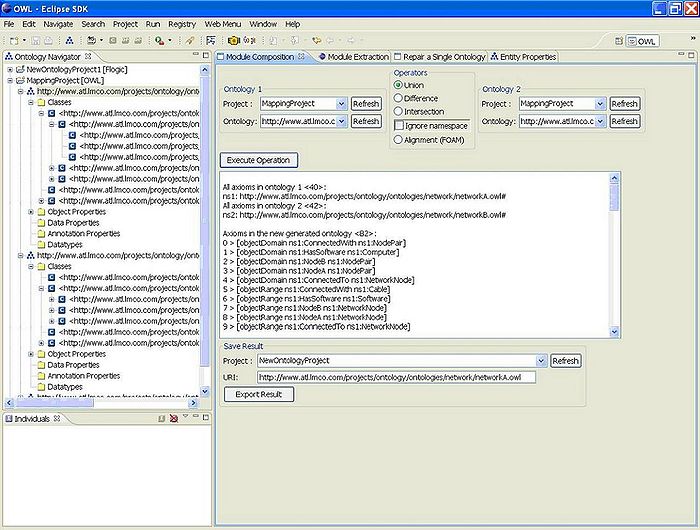
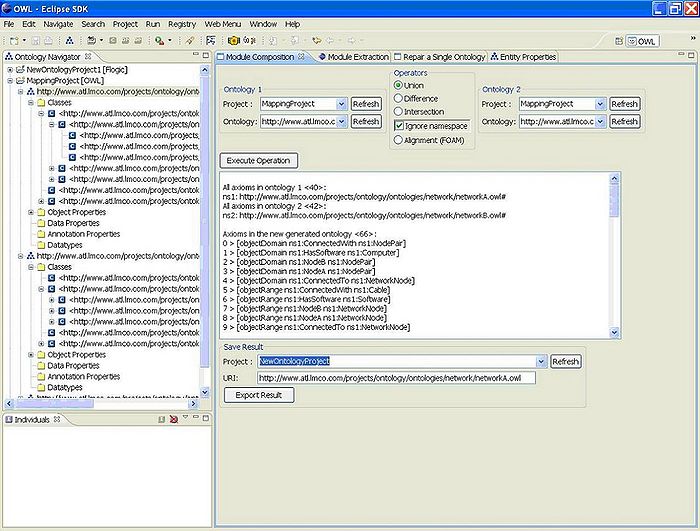
- 2. Manipulate two modules: First of all, choose the two modules in any projects by using the corresponding "Refresh" button. Then, one could choose one of the operations (e.g. union, intersection or difference) and do a simple configuration to decide whether considering the namespace or not when executing the operation. After this, press "Execute Operation" to execute the chosen operation and the results will be shown in the text area. In the result of the composition operation, the number of axioms in the two modules and in the resulting module will be shown between "<" and ">". The following figures give two examples about the operations.
Figure 1. The result of union operator by considering namespace.
Figure 2. The result of union operator by ignoring namespace.
In the two examples, the number of axioms in the input modules is 40 and 42 respectively. In Figure 1, the number of axioms in the resulting module is 82 while it is 66 in Figure 2.
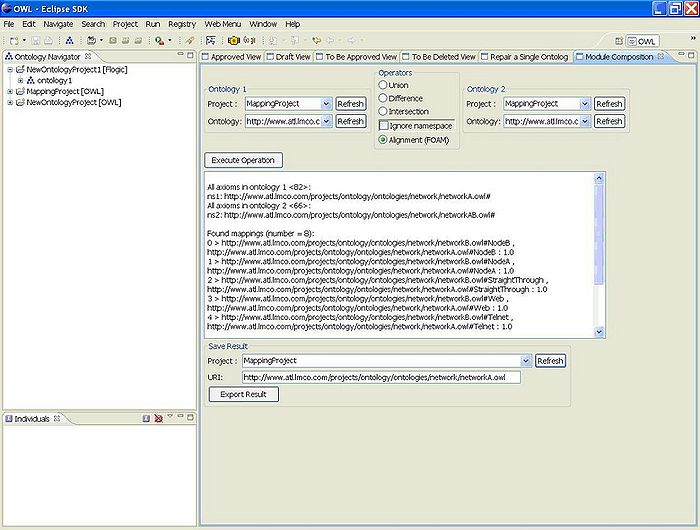
- 3. Align two modules: Given two modules, the alignment between two modules is computed using FOAM, an ontology alignment tool. See the following figure as an example.
Figure 3. The alignment between two modules.
- 4. Save results: This corresponds to the "Save Results" part in the view. For the union, intersection and difference operators, one can save the resulting module into an existing project. To do so, please "Refresh" the project list in "Save Results" part and then click "Export Result". The resulting module will be exported to the chosen project. While for alignment operation, the found alignment can be saved to a local file by simply clicking the button of "Export Result" and then choosing a directory.
Module Interface
- 1. Open the view of Module Interface: In the menu of "Windows", please choose Show view / Entity Properties. Then you can find the view of Module Interface as a tab in the Entity Properties page. This view can be seen when an OWL ontology in the Ontology Navigator is chosen.
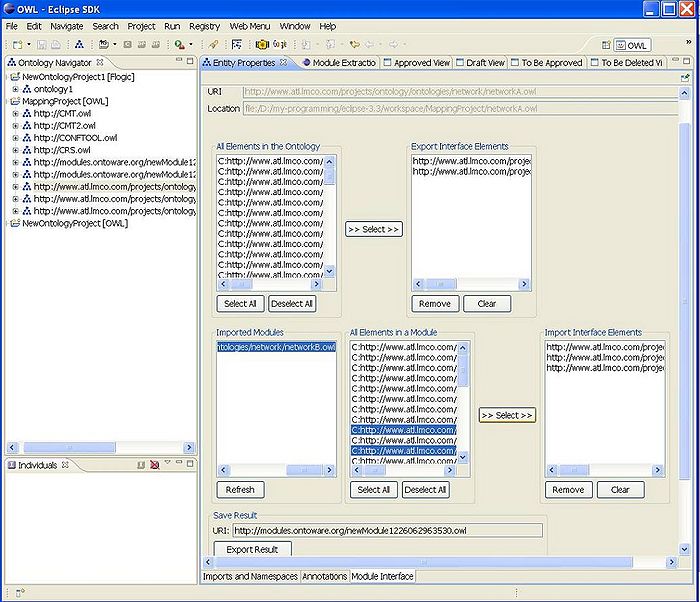
- 2. Modify Export Interface elements: When the view of Module Interface is visible, you can see the URI and physical location about the ontology you have chosen in the Ontology Navigator on the top of the view. Besides, all the elements including classes and properties are shown automatically in the list of All Elements in the Ontology. If this ontology already has defined some Export Interface elements, they will be shown as well. Then you can modify the Export Interface elements by choosing more elements in the ontology or remove some elements in the Export Interface elements.
- 3. Modify Import Interface elements: The list of Imported Modules will be initialized when the view is first visible. Then you need to manually refresh the list by clicking the Refresh button right below the list if the imported modules have been changed in the tab of Imports and Namespaces in the Entity Properties page. Then you could choose one of the imported modules and modify the Import Interface elements in this module which is similar to the functionality to modify the Export Interface elements above.
Figure 4. Modify the Import Interface elements.
- 4. Export results: This corresponds to the "Export Results" group in the view. (1) If it is the first time to create a module for the ontology, the URI in this part will be editable and an initial value is given which can be changed by the user. If the button of Export Results is pressed, a new module will be inserted to the ontology project where the ontology is stored with the value in URI area as the default namespace of the module. (2) If the module for the ontology has been created already, the URI area will not be editable with the value of the module's default namespace. If the Export Interface elements or Import Interface elements have been changed, the user could press the button of Export Results to save the changes.


